Tuesday, September 27, 2011

Warhammer 40K: 2000 Point Imperial Guard

I have a big 40K game coming up this weekend and I have been working on an army list. We will be playing a scenario where my 2000 point army will be assaulted from all sides by two 1000 point armies played by Chris and JW. Since they have two armies, that means they have the potential for twice the number of HQ and Elite units. I will have to tailor my army to match this potential threat.


Threats:
  • Lots of HQ and Elite means lots of 2+ saves and multi-wound models.
  • The assaulting armies will have to rush across the board to get me, so that means lots of transports or Land Raiders or Deep Striking units, perhaps in drop pods.
  • If Orks or Nids are present I can expect to see a good deal of foot-slogging infantry trying to soak up fire for the Elites coming behind.
Answers:
  • Lots of plasma will see to those pesky 2+ armor saves.
  • Several Lascannons will give me the ability to double-out some character models. They will also force any armor out their to be careful.
  • A meltagun hidden in a squad will take care of drop pods to prevent them from contesting my objective.
  • Tanks will run interferance, pound oncoming infantry, and snipe other tanks. I will be taking a Vanquisher to make sure no Land Raiders get anywhere close to my lines.
  • Veteran squads in transports will remain in reserve in order to respond to threats I have not anticipated.
Here is how the army is coming together:
Company Command Squad. This HQ will babysit the front line troops and annihilate anything that comes too close. The power fist will help out my tarpit unit. MotF will delay enemy reinforcements.
-Commander with power fist
-Three veterans with plasma guns
-Vox caster. This will improve my chances of twin-linking the plasma guns against light tanks and monstrous creatures and will actually increase their survivability better than a medi-kit while making their shooting more effective at the same time.
-Master of the Fleet.

Company Command Squad. This unit will hunker down in a tall building and snipe anything it can see while also handing out orders to nearby units. I went with a sniper rifle since it can threaten big things and enemy heroes at range. There aren't many other gun options that pair well with the Lascannon, but this should at least some of the time.
-Commander, naked
-Officer of the Fleet
-Veteran Lascannon team
-Veteran with Sniper Rifle

ELITE
Sly Marbo. I am interested to see how this model works out. I have heard good things but never put him in a list before. He can appear anywhere on the board, throw a demolition charge, and hopefully stick around to engage in a little shooting in later turns.

TROOPS
Infantry Platoon 1. This platoon is kitted out with a lot of long range weaponry. I think I will tend to field them as "bubble-wrap" units. This means they will usually be deployed as separate squads, each with a heavy weapon. They will ring the outside of the deployment area and shoot at any incoming armor. Once assault troops come in range, they will receive the charge, get wiped out, and set the opponent up to be shot at in the next round.
-Platoon Command with lascannon, 2 sniper rifles.
-Platoon Squad with grenade launcher and lascannon. Attached Commisar with power sword.
-Platoon Squad with grenade launcher and lascannon
-Platoon Squad with grenade launcher and autocannon

Infantry Platoon 2. This platoon can also be fielded singly, but I would prefer to deploy the individual squads together to form a tarpit in the center. This will receive a charge and hold up the enemy until one of them dies or reinforcements arrive.
-Platoon Command with heavy flamer, plasma gun, platoon standard, and medi-kit.
-Platoon Squad with flamer and heavy bolter. Attached Commisar with power sword.
-Platoon Squad with grenade launcher and heavy bolter
-Platoon Squad with meltagun and heavy bolter

Veteran Squad 1. This squad is equipped with some serious troop killing power and can also reinforce the troops in the center if they get into trouble. The Chimera brings some serious firepower as well.
-Veteran Squad with power sword and three plasma guns
-Chimera with heavy flamer, dozer blade, pintle heavy stubber

Veteran Squad 2: This squad is equipped with anti-tank guns and comes mounted in a Valkyrie. By now it looks like I am overkilling tanks, but I have to assume that some of my elements will be taken out early or won't get a shot off. This gives me more flexibility and redundancy.
-Veteran Squad with power fist and three meltaguns
-Valkyrie with rocket pods.

HEAVY SUPPORT
These three tanks are taken separately and will do their best to remain in cover and bring all their sponsons to bear. The Vanquisher will kill tanks, the others will focus on troops.
-Leman Russ with lascannon, heavy bolter sponsons, pintle heavy stubber
-Leman Russ Demolisher with heavy bolter, plasma sponsons
-Leman Russ Vanquisher with lascannon

I hope all goes according to plan. What seems more likely is that everyone will be in everyone else's way and the enemy will be on top of me in turn two. I calculate that it will take two terminators and 3 genestealers to completely wipe out my line...

- Maniple

Monday, September 26, 2011

300 Challenge: Dystopian Wars

 I picked up two boxes of Dystopian Wars minis at Gen Con and have been eager to get going on them. The models are nicely detailed and have lots of character. The big tank has several turret options as well. I started off by putting some Catachan Green fairly thinly over the flat bits.
 Here is a close up of the big tank. At this stage I began lightly drybrushing the metal bits with GW Chainmail. Whenever you drybrush, go very lightly. You can always go back and dust some more on later. If you go too heavy, it will obscure the detail and you will not be happy with the final product.
 Here is the whole army, drybrushed and ready for the next step. I will also do a few airplanes in order to get closer to my painting goal for the week. The only problem is that they will be painted in a totally different color scheme, so that may slow me down. We will see how it goes.
Since I had the green out, I figured I would quickly paint up a few more guardsmen. I have a battle coming up this weekend and these nine guys will help to round out my force. This brings my total to 77  for the month, which means I will need to finish 23 in the next few days. Let the countdown begin!


-Maniple

Sunday, September 25, 2011

300 Challenge: Dead Justice Part 4

I am pretty happy with how these are turning out. The Malifaux models proved to be quite a challenge. I only managed to complete seven of them this weekend, compared to the twenty-five+ guardsmen I turned out last weekend. The worst of it is that while I should be about done, I keep finding things I need to go back and fix. They will have to wait for now since I am at the point where I am fussing over them and will probably do more harm than good. When I do get back to them I need to add a little more blood and gore. i know they are yet too clean!


This brings my total to 68. This means that in order to meet my challenge goal, I need to grind out 32 more models in the next five days! How will I ever manage that? Maybe I need to start thinking "smaller."

-Maniple

300 Challenge: Dead Justice Part 3

 This project is taking a long time. I have been spending a lot of time going back shading and highlighting. I want to get all the tones just right and it has been tricky. This stage represents a number of steps after my last post, but it does not look significantly different. The idea with a wash or a highlight is that you don't want to move too fast and apply the paint too thick. A good wash will be very much thinned down with very clean water. The temptation is to glob on the paint and do it quick. This leaves the model without any depth and details obscured.
 Here is another highlight yet. We are getting there!
 I tried something new with this model. Blacklining is a technique where black or another very dark color is applied at the point where one color meets another on the model. This defines the area clearly and makes the light colors stand out a little better. I thinned down some black and applied it with a very thin brush. In order to get it as exact as possible I even broke out my 3x magnification eye glasses. After applying the line, I went back and cleaned up any parts where the black wasn't neat. I think it makes here look pretty good!
Lady Justice is looking pretty good, too. I need to pick out a few more details but I am finally happy with the shade of the skin. There are also a few more metal bits to work on and I need to put an inscription on the gravestone. Next I will move on to the Death Marshals and get them finished. They shouldn't take quite as long, I hope.


-Maniple

Friday, September 23, 2011

300 Challenge: Dead Justice Part 2

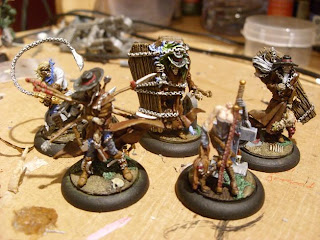
 Work continues on Dead Justice (and others). These Malifaux models make average space marines seem like children's toys. They are much more delicate and the features are much finer. In some ways they are easier to paint because the features are so well defined, but on the other hand they are more difficult because I am actually having trouble seeing them under the paint brush.
 Lady Justice got some work done on her pants and hair. I am using Dark Flesh with progressive highlights in order to get red hair. I think it will work. It is also a good next step for some of the leather. I also got my black out and fixed up some earlier mistakes. This seems to be a constant process on these minis- i have to learn to be more careful with the brush.
 The wood started with Scorched Brown, highlighted with Bestial Brown, then a mix of bestial Brown and Bubonic Brown, then straight Bubonic Brown. The coat has been highlighted as well with Bestial Brown over Dark Flesh.
The highlight is looking good, but I know I am going to have trouble with the flames. Still, the models are very cool.


-Maniple

300 Challenge: Dead Justice

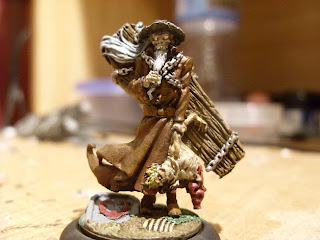
 I came back from Gen Con with a pile of new Malifaux models. Here is "Dead Justice," the limited edition version of Lady Justice and her crew. On the left is the limited edition gunslinger, Miss Demeanor. I put Lady J. and her buddies on some graveyard bases and the gunslinger will have a noose on hers. Some of them I pinned and lgued to the bases, others are left free so that I can paint the base under the model. I can glue these down when I am done.
 I also have the Nightmare edition Teddy. I modeled him catching a bite to eat. I do not have a base yet for Teddy, I will probably order the orphanage set for him from Wyrd. The spray paint did not basecoat him particularly well. I went back and filled in the missing parts with some thinned-down black paint.
 I started by doing a little work on the bases. They are mainly green and brown, but there are a few interesting things I will pick out later There is a lot of fur, leather, and wood on these models so I went ahead and hit them with some Scorched Brown. I find this to be a nice base coat for any number of these tones. With a wide array of browns and grays I can highlights and blend each texture differently from the same basecoat. for instance, the bear will end up sort of sandy brown, like an old well-used teddy bear. The wood will have dark recesses and an extreme highlight. The leather will stay fairly dark, reddish, with a glossy finish.
 I wanted to define some of the details right away so I could keep them distinct from others. For instance, I did not want to get the Judge's kerchief blended into his hair or the coffin flames covered in wood tones. A little blue paint made those bits bright so I could be sure to keep the brown away from them and make my job harder later. Some of the brown bits also received a preliminary highlight at this stage. A light drybrush with a tan color and pick out details the eye can miss. I also reshaped the Judge's chain, keeping a nice curve to it.
 Here you can see that I began working on metal and flesh. All the metal bits are a light coat of Chainmail, dead flesh is Rotting Flesh, and Miss Demeanor has a basecoat of Dwarven Flesh evenly applied. In order to get a smooth coat, I applied many fine layers rather than glob it all on at one go.
 Lady Justice received a very diluted wash of Dwarven Flesh over the Rotting Flesh base. This creates a splotchy effect on the skin and also gives some shade to the, uh, crevices. I am not looking forward to painting her outfit- it has a crazy amount of detail.
 Miss Demeanor is looking pretty good. This picture will be helpful as a reference since the lighting shows me where the painted highlights should go.

More Soon.


-Maniple

Thursday, September 22, 2011

40K Terrain: Instant City

I like to find simple solutions for terrain since having it around is such an important part of wargaming. Many people don't make terrain since they think it is too hard, too expensive or any old pile of crap will do anyway. To the contrary, I think decent terrain can be had cheaply, easily, and thematically. This technique can be used for just about any game system, just change the template a bit and you are good to go. For this project you will need:
2 Sheets of black foamcore
2 Empty cereal boxes
Pencil
Ruler
White Glue
Hobby Knife
Dress Pins
 
This set of terrain was made one day when I realized that I was going to have a 40K game the next day and all my terrain either sucked or was elsewhere. I started with a tip from White Dwarf. I took two cereal boxes and made a pair of templates. I measured out some windows and doorways using a ruler and straight edge, cutting them out with a sharp knife. Each story is about 2" tall.
 I made the second template with some arched windows that could be used for a chapel or something. The point of the template is that it will make all your buildings similar, making them appear to belong in the same city. When making them, keep all your measurements precise and take your time cutting the windows out. Consistency is your friend!
 Take your sheets of foamcore and use a pencil to trace out the shape of each wall that you want. For a ruined city, make some of them angled where they have been asploded. With the basic shape drawn, lay the template over it and trace out the windows and doors. Once this is done, use your hobby knife to cut it all out. I can't stress this enough- use a sharp knife! If all your edges are ragged and torn it will mark you out as a lazy builder who doesn't know his (ahem)... method. Make three cuts- paper, foam, paper. Don't rush it.
 Now take your wall pieces and glue them together. Some dress pins can be used to hold it all together while drying. I also cut out and measured some floor pieces. They are designed to hold models comfortably without danger of them toppling off.
 I turned out a whole bunch of buildings pretty quickly with this method that are playable right away. From here you can add window frames, floorbeams, busted doors, and custom bases for a much more finished look. A gray drybrush would also be a nice simple touch. On the right you can see a simple bunker I made for my command squad and behind that some fuel tanks made from cardboard tubes.
I also added some GW barriers and a few loops of razor wire. On the left is my landing pad. Awesome, huh?
Here is how to make the razor wire (sorry no pics ATM): Take two lengths of wire, one thick and one thin. Wrap the thin one around the thick one like the design on a barber pole. Once you get to the desired length, clip off any excess. Take the wrapped pieces of wire and wrap them around your pencil, creating a coil. Remove pencil and you are done!


Keep in mind you can buy a very nice plastic version of this set up for about $300, if you want. This cost me 15 bucks.

-Maniple

300 Challenge: Deathwatch Squad Part 2

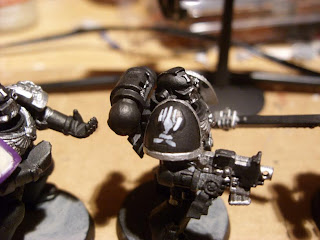
 Back to work on the Deathwatch squad. I actually painted over some of the shoulder pads and had another go at the freehand chapter symbols. I am not very good at the freehand stuff, but each attempt was slightly better than the last. On the armor, I did a couple of subtle highlights on the black and ink washed all the metal bits. The bases got a coat of the standard gray.
 It is not very clear, but you can see the highlights on the arms a little bit. I used a little Space Wolves Gray mixed with Chaos black to brighten up the edges just a bit. I also drybrushed some Chainmail on the metal pieces by way of a highlight.
 Sideview of the squad. Click on the picture to get a bigger view of the shoulder pads. Some of them need another go, but I still have more models to paint so I will get back to them letter. I picked out the purity seals and some cables on the armor before gluing on their weapons.
I realized that I did not bring the proper bolters with me when i packed these guys up. A couple of them have Deathwatch bolters in the back row, but the rest are standard. I used just a little bit of glue to hold on the temporary ones so I can bust them off later!

With these ten models "table worthy" they are heading back to the shelf. My total now comes to 61. Tomorrow I will be heading back to the place "where bad things happen..."


-Maniple

Wednesday, September 21, 2011

300 Challenge: Dread Fleet

I broke my rule about not buying any more models the other day. Games Workshop announced the release of a new naval combat board game and I immediately ordered it. I think I was a little short of my 300 goal anyway, so these models will definitely put me over the top.

I must say that the work i have been doing is very therapeutic. Many of the models I am paying attention to have been sitting around unpainted for years. It has not only been a trip down memory lane, but has given me a surprising amount of peace of mind. Just knowing they are done feels like a weight off my shoulders. It will be even nicer when I can get completely caught up and actually buy some new models without the guilt!

More pics soon.

-Maniple

pic property of Games Workshop

Tuesday, September 20, 2011

300 Challenge: Deathwatch Squad Part 1

 Here is my Deathwatch squad. I think I started putting them together in 3rd edition! There were Chapter approved rules released in White Dwarf some time ago that were pretty cool. As I recall, the Heavy Bolter could be fired on the move, the squad had access to specialty ammo, they could deep strike, and the squad could be lead by a number od different characters, including a Librarian. GW still sells a conversion kit with a number of heads, well-detailed shoulder pads, and bolters with scopes. I will be fielding them as Sternguard Veterans with a couple of combi-weapons thrown in.
 The first step was to put a fresh coat of thinned-down black paint over the model. This fills in places that the spray missed and evens out the finish, making it a bit more glossy than the primer I used. The difference is subtle, but look at these two minis. The black is smoother and brighter on the right-hand model and the left-hand model looks dull and boring. This will give me an even point to begin highlighting from.
I did some more work on the shoulder pads. These marines represent some of the marine chapters that  my buddies play. Starting in the back we have Mortifactors, Iron Hands, Silver Skulls, Imperial Fists, Eric Marines, Grief Bringers, Ultramarines, Blood Angels, Dark Angels, and Space Wolves.
 I started free-handing some chapter symbols as practice. this was my second attempt at a "U." It could still be cleaned up a bit, but considering this is my first attempt at free-hand work ever, it is not terrible.
 Blood Angels
Iron Hands


Now I need to clean up my work and highlight the armor. I also plan to hit some of the marine armor details that I have typically ignored in the past. More soon!


-Maniple

Saturday, September 17, 2011

300 Painting Challenge: The Vanirmen

 This morning I set out a new squad to work on. These are the rest of my Vanirmen, a conversion using Catachan and Marauder bits. I will use them in my 40K games as Penal Legion Troopers since they have a mix of weapons and a rough and tumble look to them. Ignore the models on the far left, I will get to them later. As you can see, they are primed black. At this stage I mentally prepared a painting plan in order to get these 25 guys done in one day. If I employed too many steps thay would never be finished. The steps were: Dwarven Flesh, Graveyard Earth shirts, Bestial Brown leather and hair, Ultramarine Blue pants, Chainmail metal, Flesh Wash, Elf Flesh Blend Highlight, Gray Base. each step would take me about an hour on 25 models, so this was an all day project.

Here I have completed the flesh, pants, and metal. At this point you could actually stop painting since they follow the "3-color" rule that most tournaments require for play. They still look flat, though, and need some more work.
 Here they are at the end with the flesh highlights, mistakes corrected, and paint covering almost all of the black primer. I did not put camo on the pants since I need to be able to distinguish them from the Vanir Veteran squad I finished last week. They look pretty good even without metal washes and highlights.
Here is a close-up of the finished model. I like doing extreme flesh highlights on models with lots of exposed skin. It really makes them stand out. This completes 25 more models, bringing my total to 51!
Soon I will turn back to the Space Marines and complete a Deathwatch squad that has been lurking around my hobby table for about five years...

-Maniple

RIP thelowercrypt.blogspot.com

I shouldn't have pressed the button...