Thursday, September 15, 2011

Malifaux Terrain: Victorian Part 1

I started this project a few years ago and got it almost done. It is waiting on a final coat of paint, which will have to wait for when I get back from school. I have been lucky enought to live in several towns that were built in the 1800's. There is a lot of "Malifaux-esque" architecture around and I spent a day with one of my buddies taking pictures of creepy old houses, factories, and warehouses. Here are some examples:
 Check out the sweet bay window

 I liked the top floor on this one.

Nice detail. Windows are particularly neat

 In order to keep room on the table, I made the footprint of my buildings small and gave them some added height. Techniques are covered in my other how-to's, just to a more fiddly extent. For example, whenever I made shingles, I made them half the size as usual. Window frames are made from wood to a standard size and glued on. I still need to go back and add porches and canopies. I also want to make a custom base for each one so they can include fences, gardens, trees and the like.
 My goal for each building is to tell its own story, but also look like it belongs in the same neighborhood.

Here is a street scene. The park piece is a circle of MDF painted brown with some flock put down in patches. The statue is a knick-knack from Hobby Lobby one of my buddies found for a few bucks.

Notice the detail on the big window. Each piece of the frame is individual. I put about a hundred pieces together to make it. Whew! The cobblestones are textured wallpaper glued to a sheet of OSB. Good luck finding this wallpaper anywhere. I am told it is no longer being made. Boo Hoo.
Once I get the paint finished I will post more pics.

-Maniple

Malifaux Terrain: Frontier Town Part 2

 Once you have your roof constructed, it is time to put some shingles on. The job looks harder than it actually is and gives a nice effect. To start, get some cereal boxes and lay them flat. With a ruler and pencil, measure out some strips between 1/2" and 3/4". Use a razor to cut them out, keeping the edges neat and smooth.


With these strips cut out, take a pair of scissors and snip off pieces that are about 1/4" wide. These will be the individual shingles. For an even look on the finished project, keep all the shingles exactly the same size. For a more haphazard or rough look, vary the width and angle of the cut slightly. Make more than you think you will need, since each roof will use a ton of thses. I cut these by the hundreds and keep them in a dish for future use.


Take your roof and run a couple beads of glue down the length of it to start the first course of shingles. Put the colored side down as the plain side will paint up much better. They should overlap the edge of the roof slightly. If you push them down firmly into the glue you will get a strong bond pretty quickly. If you then spin the roof and work on the other side, this one will be dry by the time you get back to it. When ready, run a bead of glue over the top half of the shingles already laid down and another right above that on the roof itself. Start laying down the next course, being careful to overlap the gaps on the previous course. Repeat all the way to the top. For the top of the building, cut some shingles that are twice as long as the other, fold in half, and put them along the top of the roof.

Some buildings had tin roofs as well. This is a much easier technique. Cut some strips about an inch thick and glue them evenly to the roof. Cover the seams with a narrow 1/8" strip and you are done! To paint, pick a metallic shade that you like and then wash it with some brown ink to weather it.

Once your buildings are done, it is time to paint them and finish the interiors. I turned one building into a jail by making some cells out of rabbit-hutch wire. Another became a bar by adding a long narrow barrier inside. The general store has shelves and a counter. The hotel has a removable floor so models can be placed on the first and second floors. Use your imagination when constructing this stuff and put your scraps to work.

Paint prep:
Keep in mind that spray paint will melt all exposed foam. Take your white glue and a paint brush and paint over all the exposed edges. Make sure all glue is dry before spray painting.

To begin painting, take your buildings out to the garage and hit them with some black spray paint. Don't bother using your $15 GW Chaos Black here. Go to the hardware store and find something for a buck. Even if you use ten cans you are still ahead! Put on a couple coats and make sure you get everything covered. Once dry take them inside, lay out some newspaper, and get painting.

I used a pack of cheap brushes from the hardware store for most of this work. I started by covering all the exteriors with a coat of dark brown. You could also use a shade of dark red or sandy yellow. Now highlight with a lighter shade of the chosen color. Drybrushing should be fine as long as you follow the grain of the wood. For the interiors I went with some brighter colors: blue, red, and green. You can also download wallpapers from various websites online and glue them in for a fancier look.

Finishing touches:
I wanted some signage outside, so I downloaded some Wild West fonts an made up some signs on my computer. Having a color printer is useful. I printed them on tan cardstock and built a simple frame out of balsa wood, painted in the same fashion as the building. A little glue will stick it right on. I dressed up the porches with some barrels and other effects. You could put some static grass in the gaps on the boardwalk or glue some fines or bushes to the side of the building as well. More little details will add lots of realism.

Feel like a shootout at high noon?

Trees and fences came from a Christmas town set.

Easy, Huh?


-Maniple

Tuesday, September 13, 2011

Malifaux Terrain: Frontier Town Part 1


One of my first Malifaux projects was a Western-themed town. There is a lot of reference material on the web, so finding ideas wasn't much of a challenge. The techniques used in this guide can be applied to just about any type of building. Here are the tools and materials you will need:

Large T-Square
Ruler
Pencil
Hobby knife and lots of blades
Scissors
White glue
Medium Density Fiberboard
Several 1/4" foamcore sheets
Jigsaw
Craft sticks and balsa wood. Some will need to be 1/4" square posts
Miniature barrels, spindles, fences, etc...
Paint- Dark Brown, Light Brown, Blue, Gray, Orange, Yellow
This isn't a very expensive project if you already have the tools. You should spend around $50.

Basing:

Your first step should be to plan out the floorplan of your board and get an idea of how many buildings you want to make. I wanted two smaller buildings, two long buildings, one tall building, and one narrow building. Each building would have a porch out front and one would have a side staitcase, so I added a couple of inches on the front and sides where needed. I used the jigsaw to cut my MDF to the proper dimensions. Measure twice and cut once! The smaller buildings needed a base 5"x8". The long buildings needed a base 5"x13". The tall building with the staircase needed a base 7"x8". The narrow building would not have a porch, so needed a base only 4"x11"

Walls:
Foamcore comes in sheets that are 20" x 30". In order to maximize your materials, try to keep the dimensions of your buildings within those limits. Take a minute to think about the height of your walls. Normally I try to keep the walls at about 2.5" high. You may decide to keep them smaller or larger, but this works pretty well and also maximizes your materials. Cut one 5" wide for the two storey hotel. This will leave you with seven strips that will become the walls of the building.

Here is where you have to do a little math. If you cut a strip of foamcore 30" long, then you can score it three times, fold it, and make four walls. The interior dimension will be 30", but the exterior dimension will be 32" due to the width of the foam (1/4" on each side). To get a nice even set of measurements, account for this width when making your cuts. Use the T-Square to keep everything square. If you want a building to be 11"x5", then make the following cuts: starting with a 30" strip, make a mark at 4.5", 15", and 19.5". Score through the paper on one side with your first cut. With the second cut, cut through the foam without cutting the paper on the other side. Fold at your cuts and you should have a perfect rectangle. If your cuts are not perpindicular, the building will not sit flat on the base. For the small buildings, score the strip at 4.5", 10", 14.5", and cut it off at 20".

Optional-
You may have noticed that many western buildings have a high facade on the front that is often double the height of the rest of the building. When cutting out the initial strips, you may want to leave the facade attached. In this case, one of the shorter scored sections will be taller than the rest of the strip, resulting in an "L" shape. Careful planning and drawing out all your walls before cutting will help make the most of your material.

Assembly:
Once you have the walls cut out, fold them to shape and glue them to the base you prepared earlier. Have some masking tape or pins around to hold the walls in place while drying. You may have noticed that the act of folding the walls out leaves a 1/4" missing on each corner. Use your 1/4" square balsa pieces to fill in this gap. Cut them to size and glue in. Not only does it provide stability, but will also give a nice sturdy look to the building.


 Here is a picture of what your last corner should look like. The balsa wood post keeps the edge neat and strong. Before the paint went on I also constructed some shelves and a doorframe. In the background you can see the stairway I started on for the hotel.


Here are the first four completed. Note the extra length on the front of the base where the boardwalk will go.


With the buildings assembled I used some scrap for the roof. This is a triangle, held in place with glue and pins. Cool, huh? We will cover it with shingles later. At this point just make sure it fits snugly over the roof and is at a pitch that you like.
Here is a top-down view of the completed building. Notice the facade and flush fitting roof. Using balsa wood and some spindles I put together a few overhangs for the front of each building. A few touches like barrels, hitching posts, and window frames are also a good idea.
The most tedious part of this build was the sheathing with balsa wood. While watching TV I spent several hours with a pair of cutters and a pack of balsa wood. I made a whole variety of different sizes and then set to work piecing them together on the fronts of the buildings. Some I did horizontally, some vertically. I started with just doing the facades, but will go back one day and cover the sides and back as well. If you don't want to work with balsa wood, you can probably buy dollhouse siding that comes in plastic sheets. Whatever you do, have fun!
Next session we will look at shingles and paint.
-Maniple

Malifaux Terrain: The Slum Part 3

I wanted to give a unique look to my counters and objective markers. Malifaux fuses together a lot of different genres, so I went with a wide variety of influences when putting these bits together. For this piece, I constructed a small box out of foamcore, attached a few bits from my 40K bits box and a plastic disk from a chair slider. The feet are push pins. Instead of wasting one of my nice large-size bases, I cut a circle out of some heavy card and glued it down.
With a little paint I had a super-computer! The paper spilling out the side is just that- a thin strip of paper folded over and glued to the side. Maybe not exactly steam-punk, but I think it works.

My next piece needed to be even more mysterious. Again I cut a round base out of some cardboard and then made a small box out of the same. The detail is made from thin strips of paperboard, individually cut and pieced in. The corner pieces are 1/4 in strips folded in half. In order to get them to fold neatly I scored the inside with my razor blade. Can you guess what it is?

A police box that can travel Time And Relevant Dimension In Space! (TARDIS for all you noobs). The handle comes from my bits box. I think it is for the top hatch on an Imperial tank.


The other items quickly took shape. Most of these were constructed out of white insulation foam. The statue was roughly carved out with my hobby knife. It is supposed to represent a weathered and cracked statue. In the front is a scrap pile and soulstone vein. The small counters are dynamite- small bits of wire tied together with thread and super glue. I also made some fences out of thin card and based them with a slightly heavier piece of paperboard. 
Here I have some standing stones, a campsite, a small graveyard, some ruins, and a mystical pool. The pool is a circle of foam bricks filled in with some water effects and green paint. The graveyard features a twig from the yard, a bit of fence, and a few gravestones that I carved out of some MDF (medium density fiberboard). If you can find any of this stuff it has multiple uses. It is great for basing since it tends not to warp as badly as cardboard.


Once it was all put together, the slum took on a life of its own!

I added in a twig from the yard as a hanging tree. A trick you can use to make it look more like a tree is to clip off the most interesting bit, remove a bit of the branch or stem, and then glue the interesting bit back on. If you shorten the branches in this way it will add weight and density. The noose is a just a bit of string.

The brick walls came from a website that specializes in wallpaper for dollhouses. I downloaded the pattern to my computer, shrunk it down to the right size, and then printed it on a color printer. Then I glued the bricks to some cardboard, based them on a piece of heavy card and was done!

I am pretty happy with the amount of terrain I have. The pictures show a pretty full board. Usually in a game I only use about half of what I have, although I do use a house rule that allows characters to enter and exit buildings as well as change elevation. Now get out and get building!

-Maniple

Malifaux Terrain: The Slum Part 2

The first tall building I made came from a picture in a catalog I found. It is important to work off of reference material from the era in which you are building. I am lucky enough to live in an area where many of the buildings were built in the 1800's, so aside from catalogs I can drive around town and take pictures of interesting sites. This building is built in the same manner as the others. I made it large enough for one of the other buildings to fit inside for ease of transport. Since all the ceilings are removable, they can be used to transport scenery and models. The facade of the building was made slightly differently from the last. Instead of gluing on little bits of frame to make windows, I started with a sheet of paperboard (cereal box) and cut the window shapes out. I then sheathed the building with four of these. The paperboard gave a smoother finish than the cardboard and created some depth as well. The large bay window was constructed from some scrap pieces and sheathed in layers of thin card. This is where you can really add some detail. I laid out the basic shape of the windows with some 1/4" pieces and then glued some 1/8" pieces on top of them for a little more detail. A sharp knife will help here and exact measurements when making the basic shape. Keep the lines and corners neat and tidy.

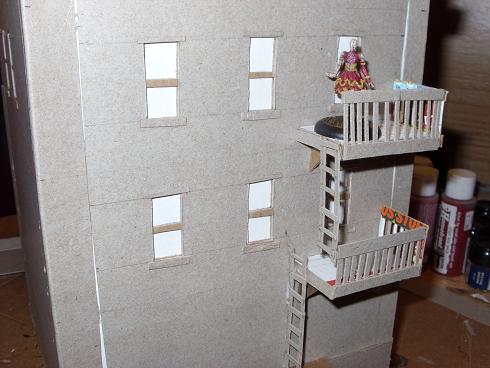
 On the back of the building I created a fire escape out of card strips. I made each level first and then glued the whole thing on at once. The railing is made of card and the floor is cardboard, wide enough for a standard base to fit on. The glue, one dry, makes a rather flimsy piece rather sturdy. Not that I have also added some triangular supports on the bottom. I find that it is little details like these that make the buildings more realistic or at least more interesting.
 With several buildings done I turned to paint. The building is painted with a few coats of red, brown on the supports, and shingles were drybrushed grey over black basecoat. I painted the windows orange and then went back over the middle with some yellow. This gives the illusion of interior lighting. You might try different colors or leaving some rooms dark, but I like how they look when all illuminated. On the left you can see a clock. I splurged on this but could not pass it up once I saw it in the "Christmas Town" display at the local DIY store. Usually these sorts of things are the wrong scale, but this one fit. When out shopping I usually keep a "slug" in my pocket. This is a small piece of cardboard with a Malifaux mini traced on it, including the base. When I see and interesting piece of terrain that I can use I will hold the slug up next to it before purchasing. This way you can check scale in the store without roughing up your nicely painted mini. Don't go crazy buying pre-made stuff. The expense can add up quick!
Here is the town so far with a few add ons. The roof pieces are removable. In order to get a nice texture on them, I glued down sandpaper, painted it black, and dry-brushed on some grey. The clothesline is simply a piece of wire with some pieces of white paper folded over and glued to it. I punched some holes in the sides of the buildings to attach it. The pipe on the left is for a refrigerator's ice maker. It is flexible tubing and comes with a set of valves and joints. You may find the same thing around aquariums. In order to keep the pieces straight, I clipped up a plastic coat hanger and slid it inside each piece of tubing. Each section is removable and the joints allow me to set up any configuation I want. The building on the bottom left has an extra layer of detail that I decided to add to the rest of the buildings. Malifaux itself is supposed to be built on top of an older city. I reasoned that the slum might be brick and wood construction on top of older stone foundations. In order to achieve this effect I grabbed a piece of styrofoam and set to work.

Using a sharp knife I cut out some small rectangles and a few corner pieces. The foam came from a packing crate and was not particularly dense. This makes it hard to work with but does have a nice stoney character when done. A sharp knife is very important here. With the basic shape cut out I cut in joints. In order to do this, simply make two cuts down the length of the foam at a 45 degree angle. this will remove a thin "V-shaped" strip. Then do the same on the vertical and create the shape of each stone. If not using a knife, you can achieve the same effect by drawing on the bricks with a sharp pencil. For a little extra detail go ahead and cut out some stones or crack off some corners. I put on some black paint and drybrushed them with a mix of blue and grey. Once dry I affixed them to the buildings with some white glue. Don't use super glue or spray paint! It will melt! The slum was looking pretty good but I needed to add my walls, difficult terrain, and objective counters.

-Maniple

Monday, September 12, 2011

Malifaux Terrain: The Slum Part 1

Last year I put together a bunch of terrain for Malifaux. My goal was to make it as cheaply as possible but still nice. It also had to have options like walls, objective markers, and elevations while also fitting in one small carboard box.

I started by going around the house where I live and collecting random bits of garbage, wire, and cardboard. This is what I came up with after an afternoon of scrounging.

 Notice that I have heavy cardboard boxes of various shapes and sizes. I only selected ones that were not warped or damaged. Cereal boxes are helpful for making shingles and detail on the building. The tubes and cups would be useful for pipes and the like, and the odd bit of whatever always comes in useful. For tools, all I needed was a ruler and pencil, a razor blade, and some white glue. I would need paint later. Some pins and masking tape came in handy to hold things together while they dried. Altogether, materials should not cost more than about $20.
 My first step was to draw out a basic plan for the board and decide on scale for my buildings. A typical Malifaux model is supposed to represent someone six feet tall. The are a little more than an inch tall themselves. If a typical storey in a building is twelve feet, then each storey of your Malifaux building should be the height of two models (not counting bases) or about 2.5" tall. I basically stuck to this math for the entire project with a little fudging here and there to make sure the buldings would fit in their container. I cut up my cardboard bokes into a bunch of rectangles (make sure to plan out the size of your buildings carefully before doing any cutting). The walls and floors were constructed by simply gluing two pieces of cardboard together and letting them dry under a heavy book. Don't use too much glue! It will warp the cardboard! Once the individual pieces were dry I constructed the buildings by setting down the floor piece and gluing the walls to it one at a time. Be sure to account for the thickness of the front and back walls when measuring the side pieces out or they will be too short. Some pins and tape held the pieces together while they dried.
 Once the glue set I attacked the cereal boxes and used some thin strips to dress up the facade of the building. I used wider pieces to cover up the join on the corner and layered other strips to make doors and window frames. This building is pretty rudimentary, but once you get some practice you can make some pretty ornate pieces. I like to cut long thin strips with a razor blade and then cut them down to the proper length with scissors. I always mark out my cuts with a pencil and straight edge first so they are uniform. I usually cut a set of 1/8th and 1/4" strips for different applications. If you use scissors you will find that the pieces curl and fall out of shape. Again, don't use too much glue and always put the colored side down.
 Here is the slum in its infancy. I made three whole buildings with removable roofs, one ruined bulding, one sewer outlet using the cardboard tubes, and a rubble pile made from a handful of cardboard scraps. To achieve the pile effect, I put down a layer of glue, mashed some scrap on top and repeated after that layer was dry until it was the height I wanted. I put the first coat of paint on the first building at this point as well. I will go over painting it in a future article.

Cheers!

-Maniple

Painting 300 models in 3 months

"I hereby pledge that I will not buy anything else until I finish painting what I already have." Have you ever said this?
My goal this semester is to get several hundred models painted. I have a great number of things started, but very little finished. I spent the first week back at school organizing my collection, assembling all of my new stuff, and getting a coat of primer on them. One big victory I had was cleaning up my Gundrian Fuseliers.


They were one of the first armies I ever started, but I quickly stopped working on them for a variety of reasons. My initial collection was too small to make a platoon, the conversions were overly complex, and the color scheme I started with was ugly. With a fresh look at the army list, I fixed up some of their weapons and cleaned up the paint scheme. I chose something simple and took a day to finish them off. After a long day of painting, I had a fresh platoon and command squad. With them finished, it may be a while before I return to them with new units.


Secondly, I put some work into another set of conversions that my brother had started on some years ago. They were assembled under the previous guard codex where a unit could be given a doctrine that allowed them to be fielded with CCW and laspistol. As a result, they have a rather eclectic collection of wargear. I decided to consolidate the special weapons they did have into a veteran squad and several penal legion squads. Again I opted for a simple paint scheme and finished up the veteran squad in an afternoon.


Finally, I worked on some character models and completely finished a new Commisar Lord for my Cadians.


What next? Quite a bit. Here is the list that I will be working on over the coming months.

40K:
12 Cadian troopers
25 Vanirmen
18 Miscellaneous Marines
3 Sisters of Battle
40 Squats (Old School- thanks, Tyler)
1 Valkyrie
1Baneblade
1 Battlefleet Gothic Cruiser
A handful of characters and objectives


Dystopian Wars:
Brittania Land Fleet
Brittania Ship Fleet


Hordes:
Finish up my Warband
2 War wolves
3 Warpborn Skinwalkers
2 units of Shifting Stones with UA


Warmachine:
A bunch of Cryx troops
Cryx characters
Sorcha
2 'Jacks
3 Man-O-War
Man-O-War Drakhun


Malifaux:
Epic Teddy
Miss Demeanor
December Crew add-ons
Rezzer dogs
Hoffman Crew
Dead Justice Crew
Tons of Puppets


This works out to about 282 models, not counting the 44 done so far this semester. Can I do it? How well can I make them look in a hurry?

If I get these done to an acceptable standard, my next step will be to go back next semester and add another layer of detail. Stay tuned.

-Maniple

RIP thelowercrypt.blogspot.com

I shouldn't have pressed the button...