Showing posts with label Mansion. Show all posts

Friday, October 21, 2011

Malifaux Terrain: The Mansion Part 5

I spent a few day doing some detail work on the mansion. One of my goals when starting this project was to add as much detail as I could without resorting to lots of pre-made bits. I could easily by some plastic window kits, but on a project of this size, the price would mount pretty quickly. Instead, I went out to the local craft store and picked up a few basic supplies to start working on the windows. So far I am pretty happy with how they are working out.
 I started with painting them brown. If you leave the paint fairly thin, the wood grain shows through nicely. Along with the popsicle sticks, I had a bag of long thin bass wood strips that would work for trim and the window cross bars. I used a pair of clippers to snip the popsicle sticks to the right length for each window frame and then beveled the edges so they would fit together at a nice 45 degree angle. each window is slightly different, so each piece was trimmed individually.
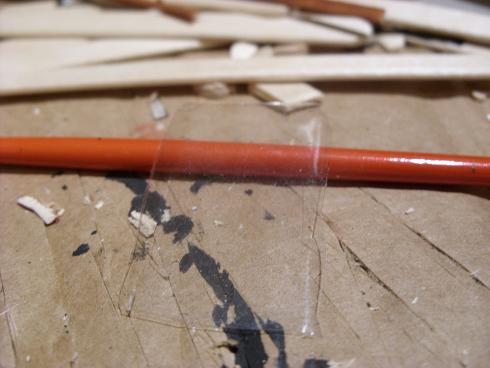
 From an old miniatures package I cut out some rectangles of clear plastic for the windows. On some of them I cut lines to simulate cracks and other had a corner cut off to simulate breakage.
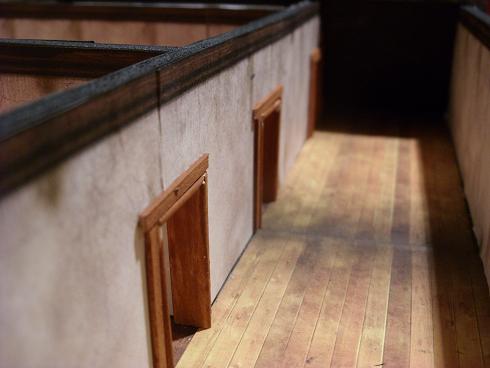
 Here are some of the finished interior doorways. I glued the top piece in first then slid the side pieces in underneath so they fit snugly. Using the thin bass wood strips, I created a simple frame around them. This adds a further level of detail and also hides the places where the wallpaper was cut out from the doorway. A little white glue holds the whole thing together.
 The windows took a little more work, since I had to fit four pieces together plus two more for the cross pieces. A few of the window frames are a bit wonky, but I did not correct them. I want the building to look dilapidated and uneven so it fits with the ethos of the place. I used a drop of superglue to hold the plastic window pieces in.
 The interiors are finished in a similar fashion as the doors, with a frame that goes all the way around. This level is just about complete. I will order some furniture soon and put a few pictures on the wall.
Here are the first two levels finished!

Well, mostly finished. I have decided that the roof line is just not working for me. I may cut the peaks of the roofs of and rework them to be flat topped. But that is a project for another day...

-Maniple

Thursday, October 13, 2011

Malifaux Terrain: The Mansion Part 4

This doesn't look like much, but I was having a problem joining the round roof to this tower. The tower itself is round at the front and square at the back. In order to join it up I layered several pieces of cardboard and carved it to blend the two shapes together. Once done, I shingled it and attached to old roof. It now has a much better fit and looks quite a bit better from all angles. next step will be to frame out the big window.

This is a project I was not looking forward to. I have done thousands and thousands of shingles and I find the work very tedious, especially on long ranks like these. So, I plugged into a new podcast and took an afternoon to finish it up. Now I need some paint to try and bring it in line with the rest of my Malifaux buildings.


The biggest job, of course, is finishing the siding. Like the shingles, this just took lots of time. Once I had all of the card cut out, it didn't really take me all that long. The corners and windows of course take a little care. Next step will be window and door frames. I need to see if I can get my hands on some balsa wood for this job. It will be a little more sturdy than card and look better when painted. Speaking of paint, once I finish a few other projects I will get some color on this.


-Maniple

Monday, October 10, 2011

Malifaux Terrain: The Mansion Part 3

 It has been quite a while since I did any work on the mansion. It was looking fairly good, but the exterior design really bothered me. The "columned" look I was going for did not look right at all. I couldn't decide how to paint it and the various gaps and uneven corners were driving me nuts.

I always go to my standard solution when things are looking bad- the humble card strip. I took a sheet of paperboard and marked it off in 3/8" lines.
 With my handy razor blade I carefully cut them out and then made about 50 more.

If you are attempting a project like this, take necessary precautions, namely: use a sharp knife, lay out sheets of cardboard to protect your desk, and keep all your cereal boxes so the evil recycling fairy doesn't take them away.

Also measure and cut carefully. That is important.
 I started on the back of the house at the top. I reasoned that if I didn't like how it was turning out, this would be any easy tear-down and replace. I started at the bottom and carefully layered each strip over the top of the one below. I used a little white glue to stick them down and my old sprue cutters to nip off the edges.
 I determined that it was looking good, so I went after the tower next. In order to get the pieces to lay flat, I had to slice off all my old trim pieces. This was a little tricky, but a very sharp knife helped out.

This tower took me quite a while to finish since there were a lot of small pieces to cut out around the windows.
 As you can see, it is coming right along. I am not too worried about getting the corners super neat. I want it to look run-down and neglected. The rough corners give it a nice look. I also trimmed off the balcony-things that ringed the tower. What were those for?

I briefly considered using balsa wood for this project, but there are a lot of places where the siding needs to bend. Also, it would have likely been too thick. I am going to paint the thing anyway, so card was my best option.
The siding will be painted to match the shingles, but in a darker shade. The siding will be black, with just a hint of blue-gray on the highlight.

The round tower will get some kind of stone treatment. Not quite sure what it will look like, but perhaps I think of something later.

Here is a close up of the work. The boards are uneven and ill-fitting. Perfect. It finally looks like a haunted house!

Now I only have the two main floors to go. Wish me luck!

-Maniple

Thursday, September 15, 2011

Malifaux Terrain: The Mansion Part 2

With the exterior coming along, I began work on the interior. I used several different techniques. For the floors on the first storey, I cut a number of small strips of card and glued them down to look like wooden planks. I painted them with a mix of brown paint and white glue. The glue gave it a slightly shiny finish.

From the interweb, I printed out pictures of area rugs and glued them over the top in the center of the larger rooms.

I was also able to print out dollhouse wallpaper and used a glue stick to paste it to the walls. Since dollhouse scale is quite a bit bigger than 32mm, I had to shrink the designs down to make them work.

On the upper floors, I opted to use paper terrain from http://www.worldworksgames.com/. They had a nice selection of papers, but I had to cut them down to fit. If I had the project to do over, I would have made my walls tall enough to fit a whole sheet without cutting.

For a little more detail, I got some little pictures from the interweb and photoshopped on some frames.

I am still working on more details for each room. So far I have an oven in the kitchen and a dumbwaiter in the pantry, as well as a few counters. I need to add window frames, furniture, curtains, interior doors, stairs, and a few more bits and pieces. One room will be a lab, so it needs some appropriate equipment. Eventually I would like to add a basement level as well with dungeons, secret passages, etc....

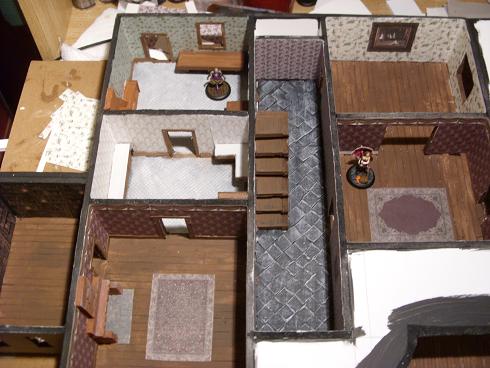
 Here is the mansion so far. The paint is pretty rough, but I have a long way to go with detail work before I tackle that.
Here is the exploded look. With all this blocking terrain it won't really be suitable for standard Malifaux games. It calls out for a special scenario or some house rules, I think. The next step is to finish it!

-Maniple

Malifaux Terrain: The Mansion Part 1

This is a project that got under my skin. The first piece of gaming terrain I ever did was inspired by Warhammer Quest. I wanted an interior space with 1" squares that could be used in a special scenario for that game. I took a large cardboard box, marked out a grid, and added interior walls made out of cardboard. It had two levels, with a series of rooms, a stairwell, and a balcony. I still have memories of a group of orks busting out of the second floor rooms, raining arrows on the adventurers and charging down the stairs to beat the ever-living crap out of them as they ran for cover and took up positions behind doorways. It was just about the coolest thing I ever did. However, after a few games I ended up throwing it away. Why, O why did I do that? Ever since then (probably seventh grade or so) I have wanted to recreate that same scene. Unfortunately, most of the games I played, Warhammer in particular, did not suit themselves to skirmish type encounters.

Malifaux changed things. I determined to build a new house. A mansion in fact. A haunted mansion.

 My first step was to make a cardboard mock-up to get the scale right. I wanted four stories, with a roof and tower.
Each storey needed to be removable with a series of rooms on each level.

I can't tell you how important it was to plan out each level. The main staircase had to match up exactly, as did the rooms that would be two storeys tall themselves. Each floor had to interlock, so the exterior dimensions had to be exact. Each floor was made out of foamcore glued to a piece of MDF. I cut out most of the doors and windows before putting them together. Further, I calculated that the building would fit completely in a 3'x3' board when "exploded."


Each storey is about 2.5" with each storey sightly shorter than the one before. Keep some models around to make sure scale of windows and doors look right

Now we're talking. Total height from base to the top of the finished tower is 22". The floorplan is about 24" by 16".

Here is a top view of the roofing. Each roof is removable and reinforced underneath. With large pieces like the top one, I like to add some weight by cutting down and bending the foamcore before gluing on the shingles.

I cut some thin strips of card and started finishing off the exterior. I added a big bay window to the front and gave it the usual treatment. In order to get the levels to lock together, I glued a thich strip of card to the bottom of each level with a 1/4" overhang that would fit over the level below it.

I added a wrap-around porch at this point and started putting on some paint with a brush.

Next step is to work on the interior.

-Maniple

RIP thelowercrypt.blogspot.com

I shouldn't have pressed the button...