Showing posts with label Slum. Show all posts

Tuesday, September 13, 2011

Malifaux Terrain: The Slum Part 3

I wanted to give a unique look to my counters and objective markers. Malifaux fuses together a lot of different genres, so I went with a wide variety of influences when putting these bits together. For this piece, I constructed a small box out of foamcore, attached a few bits from my 40K bits box and a plastic disk from a chair slider. The feet are push pins. Instead of wasting one of my nice large-size bases, I cut a circle out of some heavy card and glued it down.
With a little paint I had a super-computer! The paper spilling out the side is just that- a thin strip of paper folded over and glued to the side. Maybe not exactly steam-punk, but I think it works.

My next piece needed to be even more mysterious. Again I cut a round base out of some cardboard and then made a small box out of the same. The detail is made from thin strips of paperboard, individually cut and pieced in. The corner pieces are 1/4 in strips folded in half. In order to get them to fold neatly I scored the inside with my razor blade. Can you guess what it is?

A police box that can travel Time And Relevant Dimension In Space! (TARDIS for all you noobs). The handle comes from my bits box. I think it is for the top hatch on an Imperial tank.


The other items quickly took shape. Most of these were constructed out of white insulation foam. The statue was roughly carved out with my hobby knife. It is supposed to represent a weathered and cracked statue. In the front is a scrap pile and soulstone vein. The small counters are dynamite- small bits of wire tied together with thread and super glue. I also made some fences out of thin card and based them with a slightly heavier piece of paperboard. 
Here I have some standing stones, a campsite, a small graveyard, some ruins, and a mystical pool. The pool is a circle of foam bricks filled in with some water effects and green paint. The graveyard features a twig from the yard, a bit of fence, and a few gravestones that I carved out of some MDF (medium density fiberboard). If you can find any of this stuff it has multiple uses. It is great for basing since it tends not to warp as badly as cardboard.


Once it was all put together, the slum took on a life of its own!

I added in a twig from the yard as a hanging tree. A trick you can use to make it look more like a tree is to clip off the most interesting bit, remove a bit of the branch or stem, and then glue the interesting bit back on. If you shorten the branches in this way it will add weight and density. The noose is a just a bit of string.

The brick walls came from a website that specializes in wallpaper for dollhouses. I downloaded the pattern to my computer, shrunk it down to the right size, and then printed it on a color printer. Then I glued the bricks to some cardboard, based them on a piece of heavy card and was done!

I am pretty happy with the amount of terrain I have. The pictures show a pretty full board. Usually in a game I only use about half of what I have, although I do use a house rule that allows characters to enter and exit buildings as well as change elevation. Now get out and get building!

-Maniple

Malifaux Terrain: The Slum Part 2

The first tall building I made came from a picture in a catalog I found. It is important to work off of reference material from the era in which you are building. I am lucky enough to live in an area where many of the buildings were built in the 1800's, so aside from catalogs I can drive around town and take pictures of interesting sites. This building is built in the same manner as the others. I made it large enough for one of the other buildings to fit inside for ease of transport. Since all the ceilings are removable, they can be used to transport scenery and models. The facade of the building was made slightly differently from the last. Instead of gluing on little bits of frame to make windows, I started with a sheet of paperboard (cereal box) and cut the window shapes out. I then sheathed the building with four of these. The paperboard gave a smoother finish than the cardboard and created some depth as well. The large bay window was constructed from some scrap pieces and sheathed in layers of thin card. This is where you can really add some detail. I laid out the basic shape of the windows with some 1/4" pieces and then glued some 1/8" pieces on top of them for a little more detail. A sharp knife will help here and exact measurements when making the basic shape. Keep the lines and corners neat and tidy.

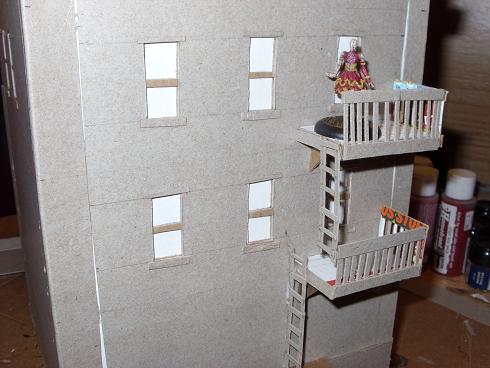
 On the back of the building I created a fire escape out of card strips. I made each level first and then glued the whole thing on at once. The railing is made of card and the floor is cardboard, wide enough for a standard base to fit on. The glue, one dry, makes a rather flimsy piece rather sturdy. Not that I have also added some triangular supports on the bottom. I find that it is little details like these that make the buildings more realistic or at least more interesting.
 With several buildings done I turned to paint. The building is painted with a few coats of red, brown on the supports, and shingles were drybrushed grey over black basecoat. I painted the windows orange and then went back over the middle with some yellow. This gives the illusion of interior lighting. You might try different colors or leaving some rooms dark, but I like how they look when all illuminated. On the left you can see a clock. I splurged on this but could not pass it up once I saw it in the "Christmas Town" display at the local DIY store. Usually these sorts of things are the wrong scale, but this one fit. When out shopping I usually keep a "slug" in my pocket. This is a small piece of cardboard with a Malifaux mini traced on it, including the base. When I see and interesting piece of terrain that I can use I will hold the slug up next to it before purchasing. This way you can check scale in the store without roughing up your nicely painted mini. Don't go crazy buying pre-made stuff. The expense can add up quick!
Here is the town so far with a few add ons. The roof pieces are removable. In order to get a nice texture on them, I glued down sandpaper, painted it black, and dry-brushed on some grey. The clothesline is simply a piece of wire with some pieces of white paper folded over and glued to it. I punched some holes in the sides of the buildings to attach it. The pipe on the left is for a refrigerator's ice maker. It is flexible tubing and comes with a set of valves and joints. You may find the same thing around aquariums. In order to keep the pieces straight, I clipped up a plastic coat hanger and slid it inside each piece of tubing. Each section is removable and the joints allow me to set up any configuation I want. The building on the bottom left has an extra layer of detail that I decided to add to the rest of the buildings. Malifaux itself is supposed to be built on top of an older city. I reasoned that the slum might be brick and wood construction on top of older stone foundations. In order to achieve this effect I grabbed a piece of styrofoam and set to work.

Using a sharp knife I cut out some small rectangles and a few corner pieces. The foam came from a packing crate and was not particularly dense. This makes it hard to work with but does have a nice stoney character when done. A sharp knife is very important here. With the basic shape cut out I cut in joints. In order to do this, simply make two cuts down the length of the foam at a 45 degree angle. this will remove a thin "V-shaped" strip. Then do the same on the vertical and create the shape of each stone. If not using a knife, you can achieve the same effect by drawing on the bricks with a sharp pencil. For a little extra detail go ahead and cut out some stones or crack off some corners. I put on some black paint and drybrushed them with a mix of blue and grey. Once dry I affixed them to the buildings with some white glue. Don't use super glue or spray paint! It will melt! The slum was looking pretty good but I needed to add my walls, difficult terrain, and objective counters.

-Maniple

Monday, September 12, 2011

Malifaux Terrain: The Slum Part 1

Last year I put together a bunch of terrain for Malifaux. My goal was to make it as cheaply as possible but still nice. It also had to have options like walls, objective markers, and elevations while also fitting in one small carboard box.

I started by going around the house where I live and collecting random bits of garbage, wire, and cardboard. This is what I came up with after an afternoon of scrounging.

 Notice that I have heavy cardboard boxes of various shapes and sizes. I only selected ones that were not warped or damaged. Cereal boxes are helpful for making shingles and detail on the building. The tubes and cups would be useful for pipes and the like, and the odd bit of whatever always comes in useful. For tools, all I needed was a ruler and pencil, a razor blade, and some white glue. I would need paint later. Some pins and masking tape came in handy to hold things together while they dried. Altogether, materials should not cost more than about $20.
 My first step was to draw out a basic plan for the board and decide on scale for my buildings. A typical Malifaux model is supposed to represent someone six feet tall. The are a little more than an inch tall themselves. If a typical storey in a building is twelve feet, then each storey of your Malifaux building should be the height of two models (not counting bases) or about 2.5" tall. I basically stuck to this math for the entire project with a little fudging here and there to make sure the buldings would fit in their container. I cut up my cardboard bokes into a bunch of rectangles (make sure to plan out the size of your buildings carefully before doing any cutting). The walls and floors were constructed by simply gluing two pieces of cardboard together and letting them dry under a heavy book. Don't use too much glue! It will warp the cardboard! Once the individual pieces were dry I constructed the buildings by setting down the floor piece and gluing the walls to it one at a time. Be sure to account for the thickness of the front and back walls when measuring the side pieces out or they will be too short. Some pins and tape held the pieces together while they dried.
 Once the glue set I attacked the cereal boxes and used some thin strips to dress up the facade of the building. I used wider pieces to cover up the join on the corner and layered other strips to make doors and window frames. This building is pretty rudimentary, but once you get some practice you can make some pretty ornate pieces. I like to cut long thin strips with a razor blade and then cut them down to the proper length with scissors. I always mark out my cuts with a pencil and straight edge first so they are uniform. I usually cut a set of 1/8th and 1/4" strips for different applications. If you use scissors you will find that the pieces curl and fall out of shape. Again, don't use too much glue and always put the colored side down.
 Here is the slum in its infancy. I made three whole buildings with removable roofs, one ruined bulding, one sewer outlet using the cardboard tubes, and a rubble pile made from a handful of cardboard scraps. To achieve the pile effect, I put down a layer of glue, mashed some scrap on top and repeated after that layer was dry until it was the height I wanted. I put the first coat of paint on the first building at this point as well. I will go over painting it in a future article.

Cheers!

-Maniple

RIP thelowercrypt.blogspot.com

I shouldn't have pressed the button...